
“Cinematic lighting” can send an image in almost any direction. “Warm sunlight from the upper left, with crisp shadows falling to the right” gives it a much clearer job.
Start by choosing what the light should reveal. Do you want to see the softness of a face, the texture of a ceramic vase, or the outline of a figure against the sky? Describe that effect before adding atmosphere.
Give the light a source and a direction
In the header illustration, a cobalt pitcher and two pears make a simple subject for noticing light. Bright edges and diagonal shadows help the objects feel solid. There is no need to add a dramatic setting to see the effect.
A useful lighting instruction has four parts:
- Source: a window, low sun, desk lamp, or overcast sky.
- Direction: from the left, behind the subject, or overhead.
- Shadow edge: crisp and defined, or soft and gradual.
- Shadow detail: deep silhouettes, or darker areas that remain readable.
Color is a separate choice. Warm sunlight and cool daylight can both be soft or hard. “Warm” does not automatically mean gentle, and “dark” does not automatically mean dramatic.
Try one subject under two kinds of light
Keep the objects, framing, and background steady. Change the lighting instruction so you can judge what it contributes.
For soft, quiet light
A matte cobalt-blue ceramic pitcher and two yellow pears on a pale stone surface against a cream wall. Soft daylight through a large sheer-covered window on the left, broad gentle highlights, gradual shadow edges, detail visible on the shaded side. Natural editorial still-life photography, no text.
For stronger shape and shadow
A matte cobalt-blue ceramic pitcher and two yellow pears on a pale stone surface against a cream wall. Direct afternoon sunlight from the upper left, a defined highlight on the pitcher, crisp shadows falling toward the lower right, readable detail in the darker blue. Natural editorial still-life photography, no text.
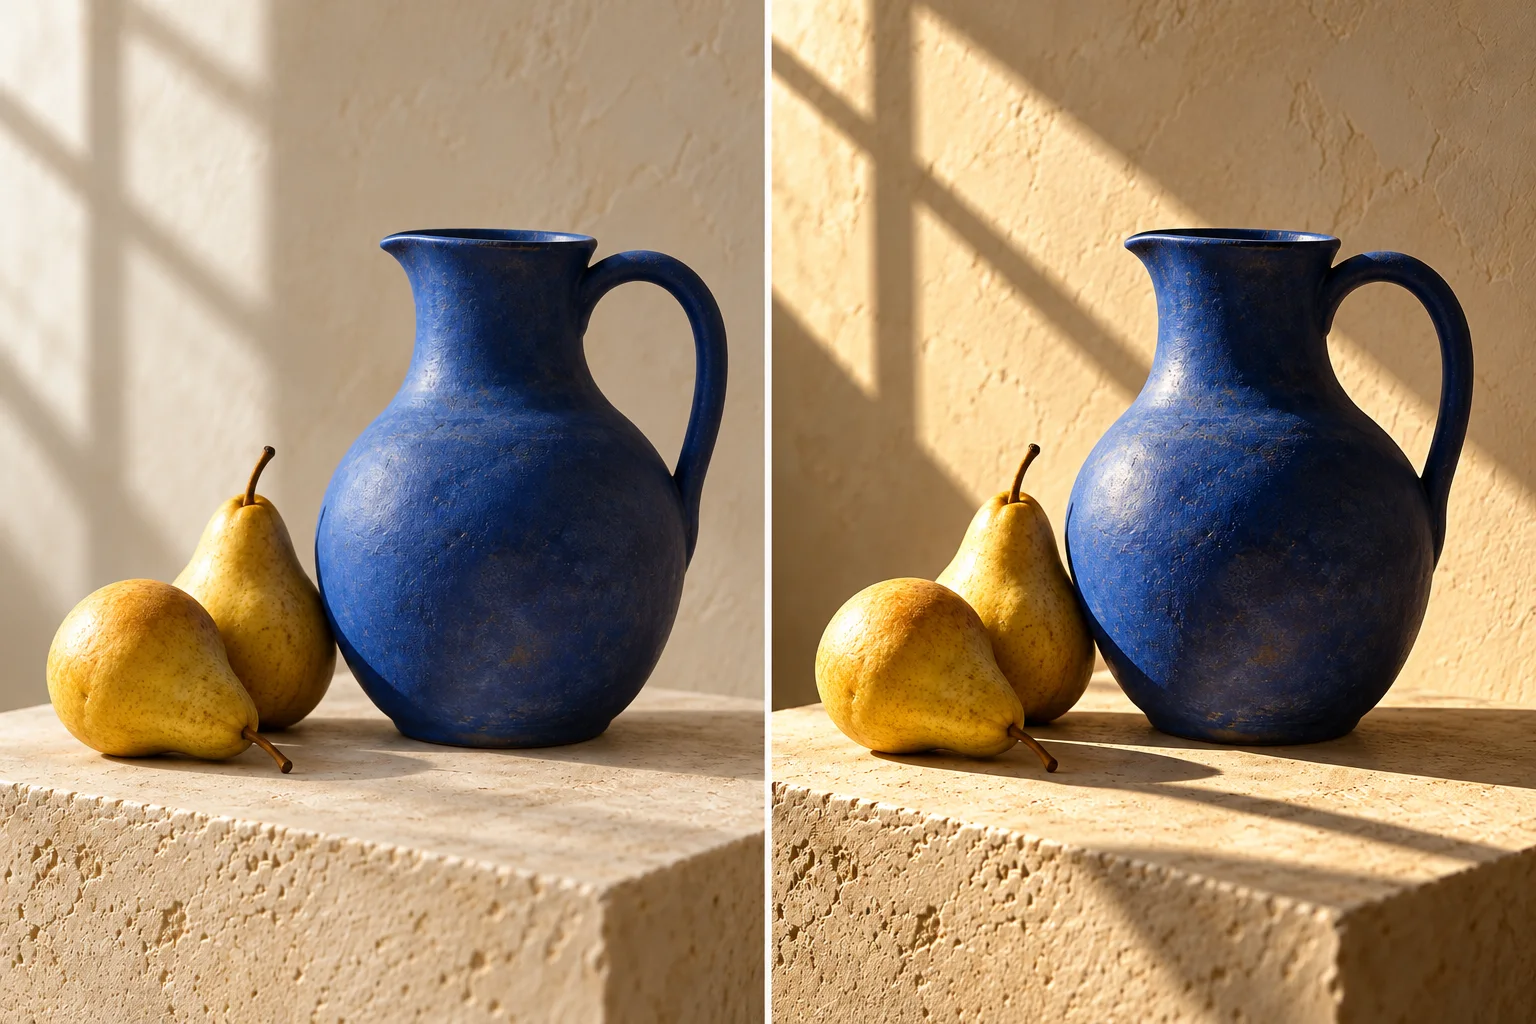
When your tool supports editing an existing image, use the first version as a reference and ask to change only the light. It may still alter small details, so check the objects and framing before treating the pair as a useful comparison.
Choose a phrase for the effect you need
| Goal | Phrase to try | Check the result |
|---|---|---|
| Gentle portrait | Soft window light from the left, gradual facial shadows | Eyes remain readable; bright skin areas retain detail |
| Visible texture | Low side light across the surface | Texture is revealed without exaggerated roughness |
| Subject separation | A subtle rim of light behind the shoulders | The edge reads as light, not a glowing outline |
| Even outdoor detail | Overcast daylight, restrained highlights | The subject remains distinct from the background |
Fix the visible problem
If the scene looks flat: specify a side light and a visible shadow instead of adding more mood words. If the background and subject have similar tones, ask for a lighter background or gentle edge separation.
If it looks harsh: ask for a larger diffused source and softer shadow edges. Simply asking for a brighter image may wash out the highlights.
If colors look wrong: remove competing light colors. Start with one neutral or warm source before trying mixed lighting.
If it looks artificial: check whether shadows agree about the light’s direction. Remove instructions that ask for several incompatible sources at once.
Keep dark details readable for a print
A glowing screen can make deep shadows look more open than they will on a printed surface. Inspect the darkest part of your subject and avoid hiding the important detail there. Lowering your screen brightness can help reveal dependence on screen glow, but it is not a physical print proof.
For a wider prompt structure, use our image-prompt guide. For a coordinated print, see choosing a palette for your room.
When you are ready to print
Choose a product and its options, then upload your finished image or create one in the design step. Review the placement and adjust the crop before ordering. Automatic AI upscaling and print preparation are included with every order. Start with your best original file; preparation can increase working resolution and improve apparent detail, but it cannot reliably repair severe blur, incorrect anatomy, or garbled text.
About these examples
PrintAIArt created these illustrations with AI to explain the choices in this guide. They are illustrative examples, not a controlled comparison of image generators or a promise of identical results from the suggested prompts. Ordering guidance was reviewed on September 30, 2026.